Although this group of post is not valuable to many individuals, it may save a handful of people hundreds of hours. You may want to know all the information that this tutorial provides or just a small portion. I have broke it up by software packages so that you have points to jump in.
Part 1. Using ImageJ to add scale bars to a large number of photos at once. (current document)
Part 2. Using Metamorphose to manipulate files names into usable captions on photos.
Part 3. Batch adding captions or watermarks to photos based on file name. In addition we can batch crop in this step.
BEFORE YOU START THESE TUTORIALS MAKE BACKUPS OFF ALL OF YOUR PHOTO FOLDERS YOU PLAN TO USE.
The following tutorials will require the use of these software packages.
ImageJ: Is the photo editor we will use to generate scale bars.
Métamorphose: A File -n- Folder renamer. This program is used to manipulate filenames into usable captions (Use metamorphose 2 beta).
IrfanView: Photo Editor/Viewer. The program what will be used to batch caption and crop images.
Part 1 – ImageJ batch adding scale bars to images:
ImageJ Intro
ImageJ is a useful tool for adding scale bars to images without much effort, but after extensive searching I was unable to find a script that would add scale bars to large groups of images. Most of the time when you take photos on a microscope or on a tripod, the scale is the same among that group of photos.
Step 1: Getting ready for Imagej
1. Group your image files into folders where all have identical resolution and scale.
Note: you can get away without doing the step above, but it makes finding errors much more difficult.
Step 2: Setting up the scale in ImageJ (You really only do this step the first time you do this process. After that you should have the macro saved)
I am not going to show you how to set up the scale in imagej because other people already have good tutorials up, but you will need to know how to do this step to edit my macro code. I sort of assume that since you found my page you already know how to set the scale in imagej, but if not to a look at these links.
https://microscopy.berkeley.edu/courses/dib/sections/04IPIII/IJsetscale.html
https://www.swarthmore.edu/NatSci/nkaplin1/scalebar.htm
Step 3:
Pre-create the directories you plan to use to save your photos to(imagej cannot make them).
Example
C:\test\40x
C:\test\100x
C:\test\200x
C:\test\400x
You will change the save path in this line “saveAs(“Tiff”, “C:\\test\\40x\\”+title);”
Step 4 Editing macros and moving them to the macro directory:
The code is provided below, but just download the example here and use your favorite editor to make modification.
// Applies a scale bar to images taken with the microscope at current camera settings.
// You will change the distance and known values based off scale information obtained in the links above.
run(“Set Scale…”, “distance=746.04 known=1000 pixel=1 unit=um global”);
// This area grabs all the images that you currently have open an starts applying scale bars
ids=newArray(nImages);
for (i=0;i selectImage(i+1);
// used to keep the file name
title = getTitle();
// You will want to change the following line to reflect the look and location of you scale bar
run(“Scale Bar…”, “width=400 height=8 font=50 color=Yellow background=Black location=[Lower Right] bold”);
// Your might want to change the save type in this line to JPG. (we convert to JPG later in this tutorial)
saveAs(“Tiff”, “C:\\test\\40x\\”+title);
close();
}
To save time you will want to make a macro of each file resolution you may encounter. For example I have one for 40x, 100x, 200x, and 400x. In each I change the values in “run(“Set Scale…”, “distance=746.04 known=1000 pixel=1 unit=um global”);” and “saveAs(“Tiff”, “C:\\test\\40x\\”+title);” Other than that you can basically leave it alone.
Save all your files to the default macro folder in imagej:
My path is C:\Program Files (x86)\ImageJ\macros (Your path is likely different as imagej dose not typically install into the regular programs directory. )
Step 5 (Back to the regular stuff) Installing and using the macro:
Grab all the photos of the same scale and resolution that I had you folder up in step 1, and drag them an instance of imagej
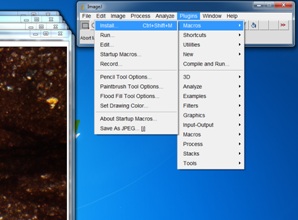
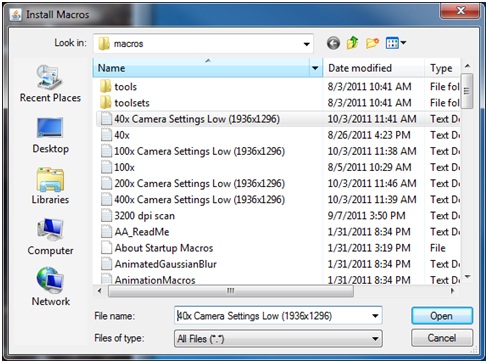
Then you need to install the macro that will work with the files you have open.
When you click open it will just close the window. Fear Not
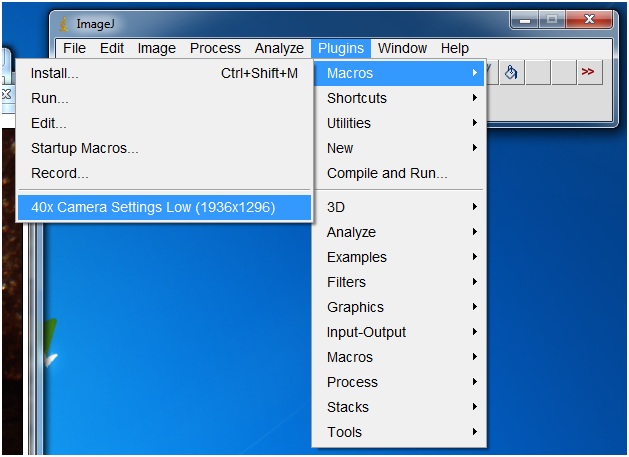
Click the macro to run it. You should start seeing photos closing. Depending on the speed of your computer you might see the scale bars being added.
The current save directory is C:\test\40x with the 40x macro. You can change it to whatever you like with any text editor. Just make sure to install the macro again if you make any changes to the text.
The macro will work for several photos at a time, but you will need to run the macro several times to get through a large group of images. I am not sure why this happens. The closer you get to completing the group of images the fewer images it will add the scale bar too. I have a feeling it has something with java trying to hyperthread, but I will take just a few clicks for hundreds of photos over thousands of clicks.
Once you have run the macro enough times all the images should be closed and resaved as tiff files with scale bars in C:\test\40x.
The first time you instal the macros you probably won’t save much time, but if it is something you need to do often you will shave off hours. In addition you look like a rock star if you are dealing with time sensitive information.


Hi Ben, many thanks for this macro and explanation, it saved me a lot of time.
As I rename each image with objective magnification at the end (eg. image1_04x.JPG), I added a few lines to your code to work with single folder. Maybe someone will find it useful too.
Of course, it’s necessary to change crop dimensions and scale settings for another camera and microscope setup.
You can find it here:
https://dl.dropbox.com/u/1703584/imageJ-macro/imageJ-macro-crop-add-scale-folder.ijm
I have several updates for this code as well… I liked several of your changes so I may include them too.
I forgot I never included the information for IrfanView to crop and add labels.
I already have that information written up so my coworkers can handle getting through it. I may try to dumb it down and post it here.
Hello! I would like to know how we could make it work with JPG, because if I change Tiff in the macro to JPG or JPEG, it doesn’t work, it tells me: java.lang.IllegalStateException: Output has not been set!
My images are in JPG so I can’t make it work with Tiff…
Thanks in advance!
setBatchMode(true);
ids=newArray(nImages);
for (i=0;i
Hi,
I want to write a similar macro but more like the one Mikka is suggesting;
I want to add some space under the picture so that I don’t have a scale bar in the picture itself (I think this is possible by changing the canvas size)
Then, depending on the filename (last or first characters) it draws a line in the added space as well as some text (e.g. 20 micrometers). I can just calculate the width in pixels that corresponds to for example 20 micrometers and change this for each of the magnifications.
can anybody help me with this?
You could do it with imagej, but it will probably be easier in irfanview as it already has the functions built in for free.
I always use irfanview and imagej together. I use irfanview to add labels to all of my images as well.
For what you want there would be a little more to it, but I tend to do some by hand so I have some idea of what is happening. I use the Boolean sort features built into windows.
Any way, to batch add a bar of color at the bottom of the image. Download and install irfanview
Open the batch dialogue, (under file or just hit “b” when the program loads–> advanced options, canvas size (middle lower area of all the check boxes), and set the size and color of the frame.
This is a kick ass tutorial.
Hey
thanks for the nice code, it was exactly what I was looking for.
If you have little programming experience (as I do) the following tips might help when you adapt the code to your needs:
– It is absolutely necessary to have also the signs ” ( ; where they belong, e.g. don’t forget the ” when you adapt the path
– Don’t forget +title when defining the path for saving the pictures
– This macro is case sensitive, best is to write exactly as it is written in the scale bar dialoge (Analyze>Tools>Scale Bar…), e.g. for a simple white line in the lower right without caption use “width=500 height=12 font=30 color=White background=None location=[Lower Right] hide text”
I hope this helps you saving the time that I just spend to figure these things out