Disclaimer:
These are just some cheaper options I have found. This page is meant to be used as a guideline. Make sure you do your own research. Do not try to blame me if you screw up your car.
The following describes the cheapest ways I have found to get to Stage 2 on a 2002-2005 WRX. If your car uses the 2.5L engine you should find another information source as this could cause your car to over boot. Boost creep is less of a problem on the 2.0L engines. (Might still be possible if you run a cattles up-pipe on the 2.0l make sure you data log your car.)
Our cars are nearly a decade old. It is difficult to justify a price tag near $2000 for a kit to get to stage 2. Only real requirement for Cobb’s stage 2 map is a highflow or catless downpipe. Without a turbo back exhaust you will sacrifice a few horse power, but the car will sound and look stock. If your goal is to keep a low profile while having a quick car than this option might be for you.
A catless downpipe is the cheapest way to go if you live in a state without emissions checks. Realistically your car still has two more cats if you didn’t swap your up pipe so I have a feeling it would probably pass most places. (better to buy used downpipe with a cat if you live in a state that checks)
Equipment you will need:
- Cobb Access port and newest stage 2 maps. (You can get these used off of nasioc for about $400-450 V2 and $125 V1) Make sure you do some reading and get the one that matches your car. I believe V2 is quite a bit better. For the version 2 unit you will be looking for AP-SUB-001.
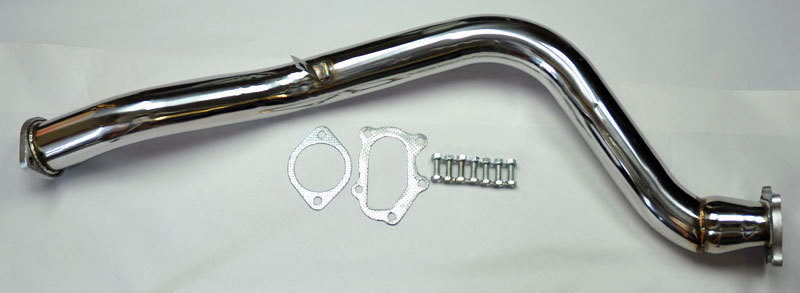
- High flow downpipe. Ebay will have a bunch of options. (I payed $84 and it came with some gaskets and bolts.)
- Tools-> metric wrenches and ratchets.
- Anti Seize
- Permatex® Ultra Copper High Temp RTV Silicone Gasket Maker (optional)
- Gaskets if your pipe doesn’t come with them
- Patience. If you have never done any work on your downpipe or turbo your bolts are going to be stuck and this is going to take awhile. (Plan to have another car available for a few days) IF you have had your turbo or downpipe apart this might only take you an hour or two.
If your not familiar with the downpipe setup this video will help.
A word of warning about this video… If you are dealing with the stock downpipe (DP) You are probably going to have some trouble. The bolts on the heat shield are crap and they get really rusty. Start spraying those with a penetrating oil of your choosing. PB blaster and liquid wrench are the most popular, but there are better ones. spray them for several days. I think there are 7 bolts on the stock heat shield. Here is another video that makes it look easy but should give you a better idea of what you are dealing with.
How I had to remove the turbo heat sheild:
I actually ended up cutting off one of the bottom bolt with a Drummel because the head was just a lump of rust with no edges. Some of the upper bolts I removed with vice-grip. Only two bolts came out with proper sized 6 sided sockets. (I only undertook this project to replace an e clip that had fallen off the turbo waste gate actuator 6mm if anyone cares) pictures from that project here
Removing the Downpipe:
Apply linear force the turbo bolts after they have soaked in penetrating oil for some time (days). I used a propane torch on all of the nuts before I made an attempt at each one as well ($30 well spent). If you are lucky you won’t break any of the studs (There are 3 studs).
The are two additional bolts that were not mentioned in the video. They attach to the heat shield and transmission. The one in the transmission came out without a problem, but the heat shield was so rusty that it was already broke off from the pipe anyway. I had to cut the one attached to the heat shield with a drummel. (again so rusty that proper sized drivers do not fit.)
Once you get it all unbolted it actually comes out fairly easy with a little gentle wiggling. (If you had two guys it would be cake)
The old O2 sensor. My battle good luck. If you have the cash and you want your stock downpipe to be usable you might want to just order a new one. Mine twisted right out of the pipe breaking the area that it was screwed into. I used a lathe to get the old O2 sensor back out of the nub that broke off, but I did order a new one and installed that. Most people seem to think that the rear O2 sensor is 100% necessary, but I did find some people that ran without one. (Probably not a good idea)
Installing the new pipe:
1. ANTI-SEIZE everything! (use the high temp stuff)
2. The new pipe will probably go in without much problem. I used a little Permatex® Ultra Copper® Maximum Temperature RTV Silicone Gasket Maker on the metal gasket surface between the mid-pipe and downpipe. My mid-pipe has some corrosion so I was sort of just using it to fill the spots that didn’t look to healthy. If you use a gasket maker make sure you let it set. DO NOT just finish the job and start your car. Next day I started my car and there were no leaks.
3. So after 24 hours I started my car an quickly noticed a loud clunking under the passenger seat. Which is the sound of the downpipe hitting the tranny crossmember brace. The quick redneck fix to this is to remove the downpipe and dent it in the correct spot with a hammer which is what I did. Other people have loosened all the bolts and fought with it to get it in a place where it will not rub. The other fix is to use a grinder or drummel to shave down the crossmeber so it won’t hit. Since I used a cheap pipe I did not have a problem bashing it with a hammer, but If I had payed $600+ for a catted DP I might have been grinding on the car instead. When you have everything tightened up and you are under the car push the downpipe back and forth hard. You will be able to tell if it is going to clear or not. The point of contact with be just past the bracket under the car. (usually right at the bend in the pipe.)
4. Reassemble everything and had a slight exhaust leak at the DP and mid-pipe. A little more Permatex® Ultra Copper tightened everything down good and waited 24 hours. No exhaust leaks.
Flashed to stage 2 for about $600 total. (Including the new O2 sensor which you might be able to salvage)
Cheap stage 2 options:
Option 1 (Version 2 access port)
Ebay DP ~$90 or Ebay Turbo back $300
Nasioc V2 unmarried access port $450 ($600 new) (This is a good tool to have even if you are not trying to go stage 2 and it has good resale value if you total or kill your car)
O2 sensor (Optional) Manual trans direct link OEM $120
Subaru OEM Down-Pipe to Intermediate Pipe Gasket (Optional) ~25 shipped This is the part I was using Permatex® Ultra Copper® to seal. You should probably get this instead.
Total cost to stage 2 $685-1045
Option 2 (absolute minimum.)
Ebay Downpipe ~$90
Nasioc V1 unmarried access port $125 (you could go open source for even less, but the technical details are extensive)
Use old O2 sensor (use a lathe if you have to) It is possible yours would come out without a problem 22mm wrench
Total cost to Stage 2 = $240
Cobb’s current stage 2 package will run you about $1800. I like their products, but there are cheaper ways to do it on older cars.
Use all the money you saved to buy yourself better tools and save up for when you have to that motor rebuild. 😛
Known Issues:
1. The stock up-pipe in the 02-05 WRX is catted. If stage 2 is run without removing the catted up pipe there is added risk that the catalytic converted could break up and get sucked through the exhaust side of your turbo. Used TD04 turbos cost about $150 for a good one. (sometimes hard to find) In reality this could happen without added boost. It probably has more to do with driving style.
2. You get what you pay for. If you are going cheap there is a greater risk that the parts you purchase may fail. Don’t be too pissed if you pipe cracks. Just make sure you Anti Seize everything and you can have it replaced in about an hour.
Finished:
When you are all done enjoy the 28-31% torque increase and louder turbo whistle. If you just do the downpipe people are claiming about 270hp at the crank. Data log and make sure nothing weird is happening. I’m actually less aggressive with stage 2, but it has been quite cold since I made the switch. The power comes on much earlier and smother with stage 2 than the stock car. I have been stage 2 for about 2 weeks. I will probably provide updates once the temperature moderates. If you don’t see any rants on this post you can assume all is well. My original data logs did not reveal anything that had be worried about the changes.
References/other stuff to read:
https://forums.cobbtuning.com/forums/ Specific to Cobb related questions this is by far the best resource.
If you are new to the WRX make sure to go dig through nasioc
Post comments if you have any questions or feel that I have missed important details.

Guys-I hope this read makes it to as many forums as polisbe!As you may already be aware of, we in the Z32 comunity have been under assault with cheap knock-offs as well. I would proudly inform you that WE, collectively are doing something about it! Through the hard efforts of a few key enthusiasts, an on-line petition was started to spread awareness of this cancer that if left untreated will eventually shut down the aftermarket developement of the COOL SHIT we like!I’m speaking out of turn for alot of folks that have done alot of work on this: As of a few days ago our #1 culprit, has been excused as a sponsor, from our largest Conference/gathering. Z-CON! This particular company, through its hefty margins and cash rich profits, has been able to sponsor many events in the past. They are usually eager and willing to be tier 1 sponsors and the easy $$$$ are tough to say no to. We’re not holding event coordinators responsible but we ARE trying to create viable alternatives to source sponsorship and making it easier for TRUE developers to participate in these functions as well.1 win at a time .keep your heads up, awareness is crucial!PS. There are thousands of sales reps bombarding our manufacturing businesses NATONWIDE, every day. The commisions these guys get are big business, and this arena is growing daily! They aggresively look for/purchase parts and equipment to reverse engineer and produce cheaper overseas. The proffitabiltiy is hard to say no to when there are so many out there that want something at the cheapest possible price. The learning curve for the value of quality equipment is pretty high. GREAT READ!
I’m actually OK with the knock-offs on older products. There is nothing special or technically challenging about building a hollow bent tube.
You get what you pay for. When I had my saabaru it had quite a few knockoff parts on it, but it was a 9 year old car at the time. Those knockoff parts are not something I would have put on my new car. I know some people will but most legitimate performance parts for new cars should have some level of difficulty to copy. Air ducting of any kind does not really fall into that category.