How to change the taillight assembly on a 2014 Subaru Forester
The following post explains how to change the taillight (tail light) assembly on a 2014 or newer subaru forester. I used a taillight assembly from ebay. It cost me around $139, but I have since found the parts cheaper on Amazon. Whoever took the photo of the part on amazon uploaded the image upside down so I do not have much faith in them.
Time Required: 10 Minutes.
Tools Required: 10 mm socket or a large Phillips screwdriver
Additional Tools that are helpful: Flat head screwdriver, Contact cleaner
Taillight Lens for 2014-2015 Subaru Forester (Part Numbers)
The following are the OEM and Non-OEM Replacement part number for Subaru Forester tail light assemblies. The TVC part that arrived actually seemed to be higher quality than the OEM part which used plastic guides while the guides on the aftermarket part were metal.
Subaru Forester 2014-2015 Passenger Side Taillight (Tail Light) Assembly Part Number (Right Side)
OEM Subaru Taillight Part Number# 84912SG040 (~ $285 At the time of writing)
The Replacement Subaru Forester Taillight I used to write this post:
Brand TYC
Manufacture Part Number 11-6597-00 (~$140 at the time of writing)
Interchange Part Number SU2819105
Save some typing Amazon Link and Ebay Link. (make sure to check both the price/availability fluctuate)
Subaru Forester 2014-2015 Driver Side Taillight (Tail Light) Assembly Part Number (Left Side)
OEM Subaru Taillight Part Number# 84912SG050
The Replacement Subaru Forester Taillight I used to write this post:
Brand TYC
Manufacture Part Number 11-6598-00
Interchange Part Number SU2819105
Amazon Link and Ebay Link. (make sure to check both the price/availability fluctuate)
Directions with photos on how to remove the taillights of the Subaru Forester
step 1: Open the rear end gate. —> This exposes the two bolts you need to remove.
step 2: Remove the two bolts indicated in the photo below. (10mm or Phillips)
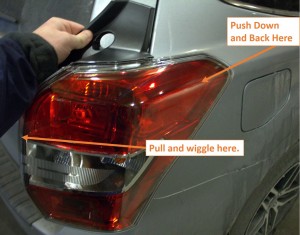
step 3: You will want to push down and back on front of the tail light. There is a guide that tends to get stuck a little depending on conditions and how much dust has collected around the guides. Note: It can take quite a bit of backward force to move the light if it has been on there for awhile, but do not get to carried away because the light assembly may pop loose suddenly and you could jerk the wire that runs all of the lights.
step 4: Unclip the old light assembly. If you are lucky you will be able to push the tab down with your fingers and it will release. I did this job when it was cold so I had to carefully use a small flat head screw driver to get the tab to release. The angle used to get the tab to release is indicated in how I drew the arrow and text box below. (The plug just pulls out with a bit of wiggling once the tab is released)
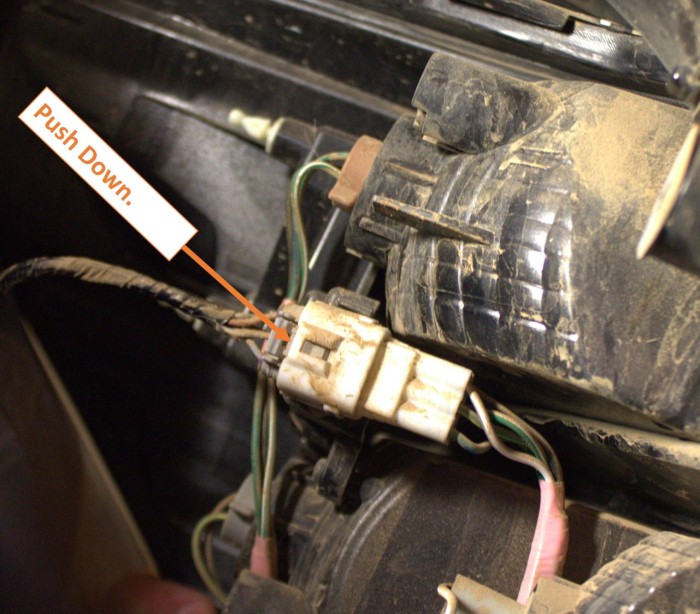
If available use a small flat head screw driver at about the same angle as the text above to push the clip on the plug down.
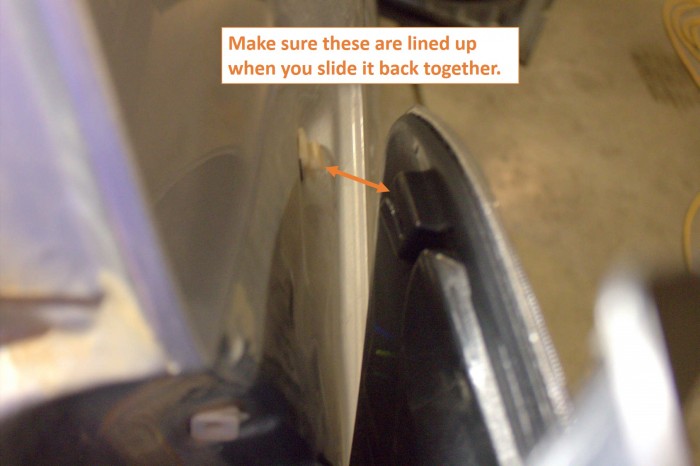
step 5: Reassemble – The only guide you can miss is photographed below. You might need to put slight downward pressure on the front of the light when you slide the assembly back into place.
step 6: Be content you didn’t have make an insurance claim for something stupid like replacing a taillight.
Note: This tutorial basically works to change burnt out taillights as well.
I will likely do another post walking through taillight replacement with part numbers, but the tutorial above would basically cover all the steps required to remove burnt out taillights as well. I believe the lights just twist out once you have the taillight assembly free. Any local auto parts store will carry replacement tail lights.
Added a video of how to remove the taillight assembly.
If you have never pulled the taillights out of the taillight assembly this is how you do that.


Many thanks to you for posting this! It was really easy to do with your instructions.